Friday, November 17, 2023

New Haven C-425s and How we used to have to build models.

Getting a New Haven U25b was relatively simple, just give your favorite hobby shop a fair amount of money and bring home a lovely Rapido model. There is also the Bowser, formerly Stewart model of the GE U25b. I have a few of those, all under various states of being built.  I am rethinking my plans for those models. I am not sure if I still have it, but I even kitbashed a U25b out of a an Ahearn U28b. There was an article in an early 1980's issue of the NHRHTA Shoreliner by Rolly Olson. You took a piece of the long hood from behind the cab and moved it to the short hood, cut open the rear grill area and added the steps on the rear of the walkways. I did most of the body work but never finished it. I should see if I still have it. Rolly also did an article on making a C425 out of a Rivarossi C424. I never built that one, but I did use some of his techniques in modifying early runs of the Atlas. You can see below my mid 1980's build of a New Haven C-425.

From this angle you can see how I added the vent shield per Rolly's article. It is just thin sheet brass bent into shape. I cut it with a pair of shears. The NH's units had the batteries mounted under the side sills so removed the battery boxes from around the cab walkways and just built small steps in front the the doors. This also meant that the handrails needed to be modified to fit the new all level walkways. 

Here is the front of the unit, I modified the cab by removing the cast on headlight and adding one that runs horizontally and air horns mounted above it. This came from Rolly's article. 

Here is the other side, same as the first side.

As time went on I became less happy with the models. The cab steps were not great, I really wanted belter handrails and they needed DCC. I decided to go an easier way, I found two NH painted shells in the correct phase on eBay.  Atlas drives have always been solid performers so I was happy to keep the original drives.  I will note the changes in the captions. 


Here is the newer Atlas model, it is the correct body phase, has great handrails, working drop steps, separate grads and the correct headlight on the cab. Leaps and bounds ahead of the first release from them, which was state of the art at the time. 

Here is the biggest flaw with the body from Atlas for a NH locomotive, it has dynamic brakes. They do not make an non dynamic version. I had visions of removing the hatches on the roof and filling in the vents on the side that this project has been sitting for a couple of years. I visited Bob Murphy's fantastic NH layout back in September and he ran a these with out removing the DBs and it looked fine. 

This photo shows how I modified the fuel tanks on the model, I do not know how the new models work, but on my old Kato made units, the bulges would pop off the basic square tank. It left two small holes that I filled in with some bits of styrene and filler nearly 4 decades ago. (I feel real old all of a sudden.) I cut off the fuel filler to the center of the tank. I just added a small pipe that is only on the fireman's side of the fuel tank. It adds a bit of detail to the plain tank.


If you want to mount the new stye shell on an old drive, you need to add a mounting pad on the body for the couplers.  I cut a small section of square styrene to fit the spot and drilled and tapped the hole for screws. I painted them flat black.

Here is the other end.

This is the material I used for the coupler pads.

These are the air horns I used on the models, I used the existing bracket to mount them. I believe the ones on the Atlas shell was not correct for the NH. A quick note about antennas, the NH did add them some time around 1967 or 1968, but they were delivered with out them, so up to you if you want to add them.

There is a quick how to on how I created my C425 models. I did add DCC and sound and the look great running with my new Rapido U25b. They do still need a bit of light weathering, or even heavy weathering as the New Haven kept these things moving being the newest and most reliable power they owned. 

Friday, November 10, 2023

U25-b, C-425 and Detail vs Accuracy

I was able to pick up one of the new Rapido U25-b locomotives.  The good news is it seems to be dead on to the NH's first 10 unis wit the large single window pane and the handrails mounted to the top of the walkways. When I received it a month or more ago, all the details were attached and it sounded great, but would not move. I sent it back to Rapido and they made repairs. Turns out the front truck pin had been sheared off and they replaced the frame. I have it back and it runs great. 


Typical packaging used by manufactures today


This is an Atlas C-425. 

The Atlas C-425 is a very nice model, not to the detail level of the Rapido model, but not so much that it does not look good with it. Now while both models are nicely detailed, the Atlas model is not 100% accurate. I choose to not remove the dynamic brakes from this model. I had planned to fill the side vents high up on the car body and remove the hatches off the rood, then fill and sand a patch pat the area and weather it all to blend it together. Now I know I will not be the only one who will notice, but I have a model ready to use on the lay out or at the club, instead of a box of parts. Changes I did make was to put the correct air hors on above the headlight and remove the fuel tank bulges from the fuel tanks. In full discloser, I built the fuel tanks i the 1980's when Atlas first released the C-425.  I was not happy with my modeling and paint job on the early models and I bought the decorated shells off of eBay.  I think the models look great together and am glad wit the route I took to get a model complete. 

Here is a quick video of the two models.


.


Thursday, November 2, 2023

Travel Club Conclusion

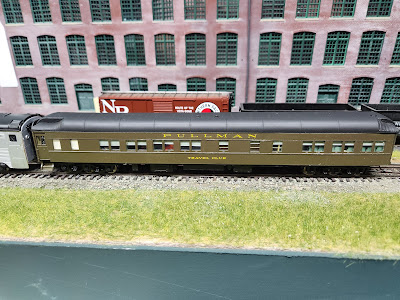
Picking up where I left off on building Travel club 8 section Restaurant.  I painted the sides and ends with Tru Color Pullman green.  I lettered the car using Micro Scale Union Pacific post 1948 decals. I had to piece together the word travel. Once the decals are nicely settled, I sprayed gloss coat to hide any decal film. I then followed with a light coat of dull, giving a satin finish.

In between the various painting a letter steps I but together an interior using the parts from the solarium and 10-1-2 to create a reasonable interior. I added a few seated passengers. Theses are inexpensive ones from Amazon.  

Here is a side view of the kitchen side of the car. Please note I did
 not do any work on the bathroom next to the kitchen. You can not
see it once the car is all together. I should have taken the parts out
for use on future projects. 

This shot give you a better view.

I add the widows back into the car, again, using the original Walther's window material from the cars. I was also able to make them fit into the few NERS widows I used. I then added brass wire for the handrail in the aisle opposite the kitchen and bathrooms. I like the way this looks on the cars. I then added widow shades made using printed heavy paper varying the heights.  

The roof ended up being a bit of a hassle. I was originally going to use a Branchline line 6-3 roof with NRS A?/C duct work added, but the mounting methods are not very compatible, so I was able to get a roof directly from Walther's and I then added the extra A/C duct work.

Here is the finished car.  It is not a perfect model, but look great on a layout and with a mix of other cars.  

This is the aisle side of the car, the interior handrail is
visible on the windows.

Same side of the car, coupled with a mostly complete New Haven Beach
 sleeper. The roof is not yet attached plus a few this need to be finished. 

Here is the solarium end. This makes the cars stand out a bit from others.
 Of course on the Bar Harbor Express and the Night White Mountains,
 this type of car was placed mid-train. 
 
Here is the kitchen side of  the car.  This side is a bit more interesting
with the kitchen widows and mid train bathroom. 

This was a fun build.  I am unaware of any kit or brass car on the market for this style car. Pullman's use of modular components make it possible to kitbash most any car you want. Please drop me a line if you have any questions on the build. 


Wednesday, November 1, 2023

Travel Club

First off sorry for the long delay, I have been spending time doing home projects and yard work and have taken a bit of a break from modeling.  I have jumped back in and completed the Pullman Travel Club. This car is an 8 section / Restaurant car and in the late 1950's was in Pullman Pool service. During the 1950's these cars were regulars on the New Haven, B&M, and MEC during the summer.  They were used on the Bar Harbor Express and the Night White Mountains. 

This is from the April 1957 NH Consist Book.


This is from the April 1955 NH Consist Book


The two pages above come from the Kratville Pullman
Car Catalogue.


I wanted to build one of these cars as it needed for one of the trains that will run on the layout, The Bar Harbor Express and it is a neat looking car with the Kitchen widows and the end windows. This is one of those all in one cars that Pullman created during the depression to help railroads cut costs. One car has sections, light food service, lounges seats and solarium style end windows, reducing the need for a full diner and/or lounge car. 

After reviewing the available plastic models, I choose to kitbash the car out of a Walther's solarium and a 10-1-2. Everything from the vestibule to end of 8 sections is straight from the 10-1-2. The balance of the care is pieced forgather from the solarium, left over parts from the 10-1-2 and some New England Rail Services windows. To plan it out I made photo copies of the sides and cut them up to plan it out. 


This is the kitchen side

This is the aisle side

After the car is planned, the cutting begins.  For someone new to kitbashing, this is the most nerve racking part of a build. The thought of cutting up expansive models that could be total ruined is not pleasant.  The good news is that if you watch eBay or go to local train shows you maybe able to pick up these models very inexpensively.


I will cover the balance of the build in my next posting.  The good news is I finished the car already so there will be no long delay.


Monday, September 18, 2023

Digging out the old stuff

I have been seriously modeling the New Haven Railroad for over 40 years.  The excitement of the E&B Valley Osgood Bradly, then the 8600 stainless steel coaches and county cars made the possibility of making New Haven passenger trains for a high school / collage student a possibility.  Brass cars were way out of my price range. E&B Valley (later Eastern Car Works) also made a series of Pullman Standard smooth side lightweight passenger cars, a 4-4-2, 6-6-4, coach diner and obs.  Why am I rambling on about this?  I came a cross four of these cars I built years ago, but do not plan on keeping.  I dawned on me I have a bunch of Concord Jct and NKP Company brass car sides. I also have a stash of Train Starion Products 41-BNO trucks that work great on these cars. 
Here is the underframe. I added .030 thick styrene strips to each side to
compensate for the thinner brass sides from the original plastic. 
 The floor drilled and tapped for 2-56 screws for trucks and couplers.

Here is the roof before I added the .030 styrene to the taps on the side.

When adding the .030 strips, make sure to lave a blank area
for the vestibule window. 

Here is the roof with the styrene

I glued one end to each side making sure to
 maintain a 90 degree angle.

Here I am clamping the two sides to the floor. 

Here are two cars with the roofs temporally added.

Here are the diaphragms I use for the cars, I would
 recommend the ones molded in black.  

Here are the partially built diaphragms.


Here are the TSP truck kit.


Here is Allens Point.  It is one of the very few cars that got the
 revered logo, a black NH on a red field.

Here are three cars. I built two per what I just wrote up, the third I
 did a while ago using a TSP core kit.


This was a fun way to clean up stuff that is sitting around the train room, not going out and buying Walthers PS cars saved a lot of money (and time). These may no be sate of the art cars form Rapido or Walthers, but the look good on the layout and I am not waiting for somebody to bring them out in HO scale.  If you don't have or can not find the brass sides, Union Starion Products makes the sides in styrene.  

Last Week's Wordless

I got a couple of questions about the Boson and Maine milk car I posted.  It is a Nickel Plate Products brass model form the 1970's. It came as part of a two car set withe the modernized Eire coach I painted into Delaware and Hudson colors that posted previously.  The decals are from Microscale B&M milk car set. The Eire sold a number of cars to the B&M in the early to mid 1950's.